
Click on the task number that you got on your weekly compliance tasks email. This will take you to the action page on the web.
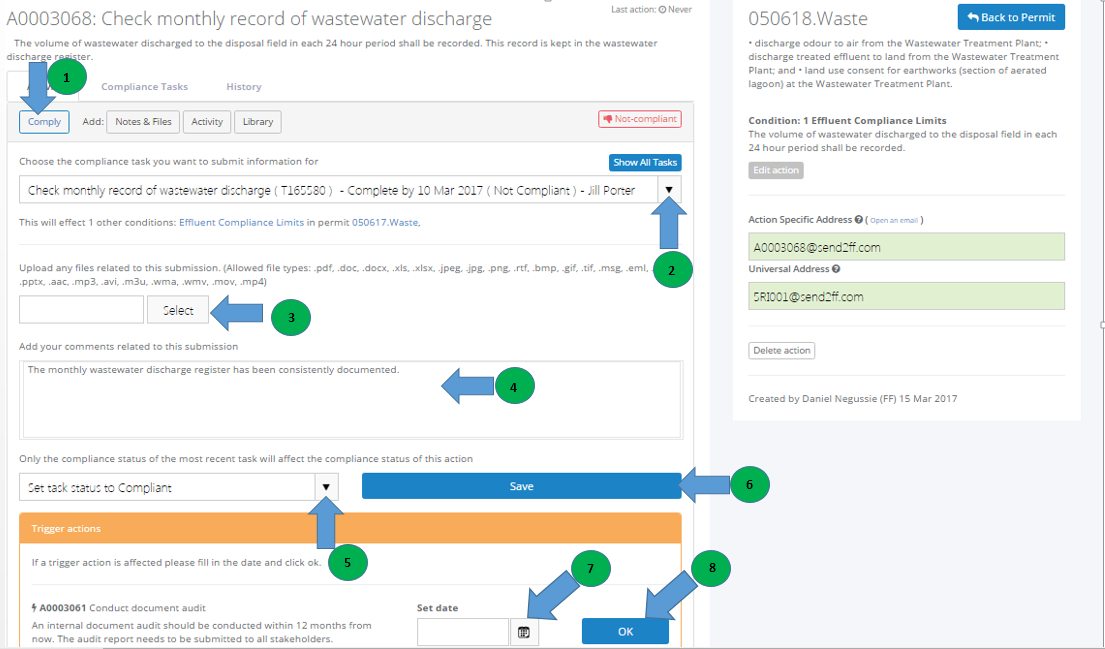
- In the Activity tab, you can add compliance information/update the compliance status of the action by clicking on the Comply button. Click on the Comply button.
- Select the compliance task you want to submit information for from the compliance tasks drop-down list. (Note: Please recall that recurring actions result in multiple tasks as per the frequency whereas one-off and as-required actions will only have one task.)
- Select a file to upload as evidence that relates to this task's compliance. (Optional)
- Add your comments for this submission. (Mandatory) (eg. write what has been done to comply.. eg. "samples have been collected and sent to lab.")
- Select the appropriate compliance status from the compliance status drop-down list. When setting the new compliance status, there are different options to select from:
- Leave task status unchanged - if the action is already compliant and you are just adding more information and vice versa.
- Set task status to In Progress – if the action has multiple tasks you can update the action to say you have done the first task and set it to In Progress while waiting for the next task to be completed. E.g. If the Environmental Management Plan has been finalised and sent to Council, you could add this information to the action along with a copy of the plan, but set the status as In Progress as sign-off from Council is still required.
- Set task status to Under Review – If the action is being reviewed.. say by a Manager.
- Set task status to Compliant – once the action is fully compliant set the status to compliant (Done).
- Set task status to Not Compliant – if the action is not yet completed or the results of carrying out the action show that the condition is non-compliant. You can close the task with a "Not Compliant" status and give a reason for the non-compliance. Select the checkbox to close the task.
- Click Save. If there is a trigger action continue on to Step 7 otherwise you are done.
- For the trigger action "A0003061" as shown in the picture set the date using the calendar icon (if the event has occurred and the action is being triggered)
- Click Ok to create the trigger tasks on the specified date. (Note: Steps 7 and 8 ONLY apply when there is a trigger action associated with your action. Most actions will end at step 6)